Glaze Principles - Varying Alumina and Silica
A summary of some of the important effects of varying alumina and silica that can be seen using the grid method
Starting Simply
The Grid Method starts with a consideration of the "base glaze", which is the glaze before you add colourants and opacifiers. Glaze is a glass, so think of the base glaze as the equivalent of colourless glass.
The three important recipe variables in the base glaze are fluxes, alumina and silica. The Grid Method enables us to study the effects of these three variables. The main tool for this exercise is the grid tile upon which there are fired a set of 35 related glazes.
Any one grid tile varies just alumina and silica for a particular set of fluxes. So we start by looking at a basic set of glazes and see how these two variables can affect the glaze.
The following image is of the Standard Limestone Set. This is a standard set for high temperature glazes, and it can be considered as a convenient point of departure on this journey. The flux materials are feldspar and whiting (calcite) in the proportion of 7 to 3. All 35 glazes in this particular set have feldspar and whiting in these proportions. For example, Glaze 31 (the square in the bottom left-hand corner), which consists of 100% flux materials, is made up of 70% feldspar and 30% whiting; the rest of the glazes have kaolin and quartz added to give a range of alumina and silica.
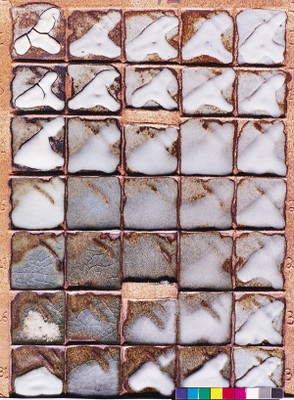
Standard Limestone Set
Reading a Grid Tile
Each grid tile contains a great amount of information which is not necessarily obvious. If we understand nothing of the Grid Method, then looking at one of these tiles becomes an exercise in appreciating the glazes one by one: this one is nice, that is boring, etc. However there is a whole extra layer of information we can access once we know how to read one of these tiles, and it is this that allows us to begin to understand cause and effect, and how to manipulate glaze recipe, clay body and firing parameters to achieve a certain effect.
We should always look at the tile the right way round, with A (glaze no. 1) in the top left corner. Then it's a bit like we are looking at a graph of alumina and silica variation. Alumina is increasing as we go from the bottom of the tile to the top, and silica is increasing as we go from the left to the right.
We need to see the glaze fired in different thicknesses from thin to thick. This can be achieved by the design of the tile and also by glaze application. In the image above, each square on the tile has a couple of diagonal raised ridges for the glaze to break over, giving some indication of what will happen with thin application. Some of the grid tile images on this website also have a circular depression where the glaze pools, showing the effect of thick application. In the tile shown here, the glaze was applied twice to each square, firstly all over with a thin application, and secondly applied thickly in the pattern that is clearly visible in the A corner. Where this pattern starts to disappear, this is an indication of increased fusion, until the glaze becomes runny. A better indication of runniness needs a further trial on a vertical test piece or a small pot. The horizontally fired grid tile is not going to reveal all the possibilities of a glaze, not by a long shot. However it is a powerful tool to reveal glaze principles and discover new glazes.
In many cases exciting possibilities can be seen on the grid tile only by studying the tile with a hand lens, looking at the subtleties arising from different glaze thickness, crystal formation, and sometime a lens is necessary to detect crazing especially in dark or opaque glazes.

