The Grid Layout
Different grids are always laid out in the same pattern, leading to a consistent result that is easy to interpret.
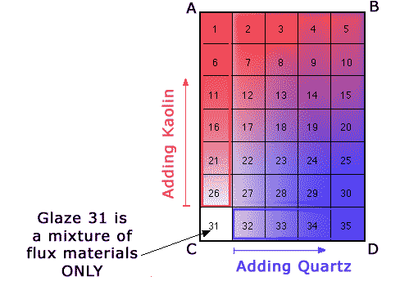
The grid is laid out with 5 glazes across by 7 vertically, to give 35 glazes in all. The starting point is the bottom left square, Glaze C (glaze 31). Apart from any optional additives (colourants etc) it's made up entirely of flux materials. (see diagram below).
So in summary, for any one grid we choose a set of
fluxes and vary kaolin and quartz to give every possible combination
over a wide area (usually covering the full range of useful glazes).
Zones
So on this grid we can see every combination of kaolin and quartz from zero to high (above).
Further, we can now think of zones of glazes as shown in the diagram below (right grid image):

Note: Corner B is high in both alumina and silica (from the high content of both kaolin and quartz). If alumina and silica are high, fluxes must be relatively low, so we can also think of this area as low flux glazes.
We can think of the middle of the grid as representing a “balance” of flux, alumina and silica. Balance is an important concept in glaze technology.
So
we have come to the point where we can think of the grid as having five
zones, and we will discover that these zones tend to have their own
characteristics that are repeated again and again in different grids.
 Previous: Inside the Base Glaze

