Making Grid Tiles
A description of the layout of the Grid Tile, and instructions for manufacture.
Making the Grid Tiles
Copyright © 1998 by Ian Currie
Make the tiles in a variety of clay types but definitely include some white clay and some iron-y clay. If possible include some porcelain as well. You may not use all these, but you will learn much more if you see the results on a range of clays, and some times it will reveal where you need to go; sometimes in order to achieve a particular glaze quality, it is the clay body you need to change, not the recipe.
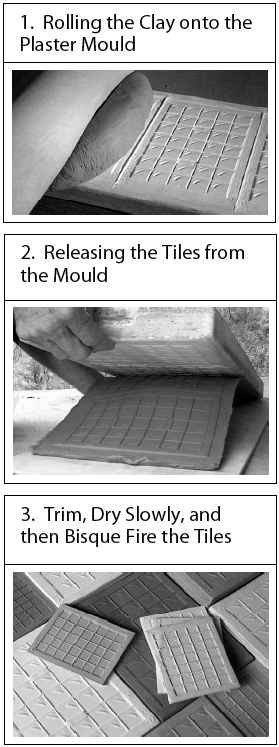
They are easiest made by rolling the clay onto a special flat plaster mould that is quite easy to make. Wait a few minutes while the plaster sucks some of the water from the clay, and then it is easy to release the clay from the mould.
Note: the plaster mould being used here is for producing several tiles at once. You may prefer to start simply with a mould that produces just one tile at a time.

- Images taken from "Revealing Glazes - Using the Grid Method"
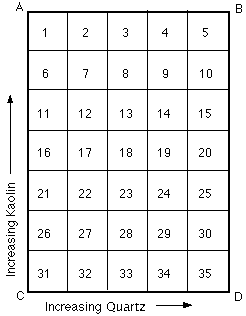
The tile has a series of square cells with retaining walls for the 35 glazes laid out in the same order as the grid of 5 glazes across by 7 down. The compartments in photos 1 and 2 are about 1 inch (25 mm.) square.
The plaster mould is made by carving grooves about 2mm deep into a flat block of plaster so it looks a bit like a shallow block of chocolate, and rolling clay onto this to give 2mm ridges. Make the outside ridges wide (about 10mm) to provide a border and somewhere to put kiln wadding when stacking the tiles on each other for firing. Also carve some shallow diagonal grooves into the corner of each of the 35 compartments in the plaster. This gives some raised texture on the tile for the glaze to break over. A good size for the compartments is around 1 inch or 25mm square. If you intend stacking the tiles for firing, you will need to separate them about 1 cm with kiln wadding. You will also need to support the tiles in the middle or they will sag. For this purpose, make the retaining walls between cells 8 and 13, and also between 23 and 28, wide enough to provide a glaze-free area for a piece of kiln wadding, 10mm or less.
Engrave an "A" into the top right corner of the plaster so it appears on the top left corner of the tile. Count the number of compartments in both directions! It's easy to make a mistake. We want 35 compartments in a 5 by 7 format.
Scratch the clay body identification into the back of each grid tile when leather hard.
The same format is used in each set which allows standardization of
many aspects of the experimental method. This includes being able to
look up all the recipes from a table, or at this web site, we produce
the recipes at the Calculation Page. The production of extra "clone"
tiles of a particular set takes very little extra time. With a little
care they can be kept indefinitely to be fired in a variety of firing
cycles. Handling, labeling and documenting time is minimized. You only need to record one recipe, the recipe for corner C. From this you can produce all the rest of the recipes using the tables or the Calculation Page.

- Grid with numbers and A, B, C and D, Plus the Kaolin and Quartz arrows.
